

Education
How to get started on Vela exchange
The Vela Exchange is a self-custody-driven, permissionless perpetual exchange that makes use of blockchain technology to deliver fast transactions, secure trading, and extension into other synthetic options and derivatives. The Vela Exchange has a reward programme designed to keep token and reward creation under control while maintaining high incentives for liquidity provisioning and trading. This article seeks to intimate users on how to execute their first trade on the exchange.
Connecting Wallet
- Visit the Vela exchange website
- On the home page, click on “connect account’. This will connect to the desired wallet. Depending on the wallet, an authorization request will be made by the wallet to authenticate the connection.

- Once the wallet is connected, agree to the terms and conditions and sign in. This will require another authentication from the connected wallet.
- Enter your desired username, email, phone number, and other required bio-data. (This can be skipped)
Start Trading – Deposit
Once your wallet is connected, click on “trade.”

- Click on “deposit.”
- Select the token you want to deposit. (Presently, only USDC can be deposited).
- Click on “approve” and grant the exchange permission to deduct the fee from the connected wallet.
- Select the amount you want to deposit and click on deposit.
Another way to make a deposit is by clicking on “account”. Once you click on the account and select deposit crypto, it leads to the just-explained pathway. Another alternative is to select the “cash in/cash out” option.

Through this, you can make deposits and withdrawals through integrated payment platforms that convert fiat to cryptocurrencies and vice versa.
Withdrawals
To withdraw, users can use the “Cash in / Cash out” option and click on withdraw Crypto. This will be sent to the desired bank accounts via the integrated payment platforms.
Another method is to withdraw from the “deposit and withdrawal” section. This sends the cryptocurrency to the connected wallet.
Trading (perpetual)
- To start trading on Vela, you can select between long or short trades after deposits must have been made.
- To execute either a long or short trade, there are a couple of risk management options. There is “market, limit, stop market, and stop limit.”
- Once the desired risk management option is chosen, input the amount of cryptocurrency that will be used as collateral.
- For “market”, the market order will find a matching price tag as it’s automated. For limit, the matching price tag can be selected manually.
- Before executing the trade, you can choose the leverage level. On Vela, it ranges from 1x to 30x.
- If you don’t want to use leverage, uncheck the leverage box.
- To place the order, click on either ‘Long” or “short” and then confirm it.
- To confirm the order, a transaction fee request will be made.
- Once this has been confirmed, the trade is executed and it’s displayed under “open positions.”

Closing and Editing a Position
Click on the “three dots” and select the desired action.
![]()
- Clicking on the “three dots” shows “close position, add to position, edit position, edit SL/TP and Add trading stop.”
- Adding to the position requires the use of ETH. This ETH will be added to the existing position to increase the profit margin. (This is mainly used by traders who make use of leverage).
To edit collateral, you can add to or remove it from the used collateral. The removal from the used collateral reduces the profit margin and the addition yields a larger profit.
- Edit SL- Stop loss or TP- Take profit.
- SL is used to prevent a position from going below a particular set price. You will also choose the percentage that should be closed from the open position.
- TP allows you to take profits without closing your position. To do this, a trigger price will be set and the amount that will be taken will be set too.
- A trailing stop can also be added.
- To close position, select “Close position” and choose the exact percentage that you desire to close.
To confirm each of these, Vela requests authentication from the connected wallet, taking a transaction fee.
Staking
Click on the “stake” icon beside the menu bar. This is just beside the “trade” icon.
You can decide to either mint VLP or redeem VLP. USDC is needed ro mint VLP and VLP is needed to redeem VLP.
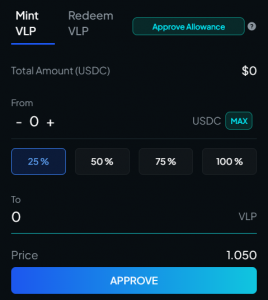
The “VLP and Vela and eVela” option is where both Vela can be staked in exchange for eVela and eVela can be staked in exchange for more Vela tokens.
Conclusion
Formerly known as Dexpools, Vela is a decentralized exchange, entirely on-chain order book exchange launched on Arbitrum. Through this guide, users will be able to set up their vela account, create their first perpetual position on the exchange and also stake-to-earn. Crypto trading can be risky, ensuring a proper risk management system is in place and conduct your own due diligence before taking a trade position.
Read Also;
Create trading bots, copy trade & manage your crypto portfolio on Mizar


2 Comments